Tuesday 2 October 2018

A Bit of Fantasy

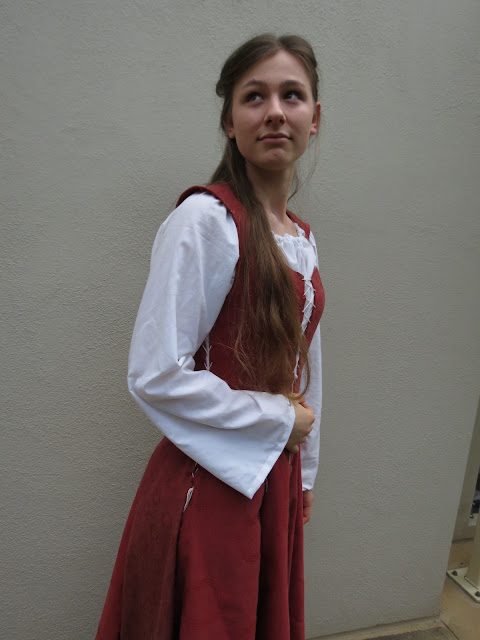
My dear friend and budding author has recently been working on her first book and asked to do a photo shoot with me for the front cover. My mind immediately sprung on ideas of recreating, Zara, the main character's, dress/coat. She draw me some pictures of the outfit she had in mind which converted a medieval inspired dress into a long coat by adding full-length slits under the lacing in the centre front, back and sides; thus making the outfit very practical.


The whole project took me less than a day and I completely skipped making a mock-up, but it turned out to be almost perfect!
I used a doona cover for the dress but I ran out of fabric so I was forced to cut the right side-back panel out of the decorative border which has a slightly different pattern and colour.


For the chemise, I cut out a basic peasant style blouse out of a sheet. I completely guessed the width of the sleeves and the amount of gather around the neckline but it turned out really well!


All in all I'm very happy with how this turned out. I originally planned to have the lacing gaps larger but it still looks really nice with how they are. It is a really flattering design and since making it, my sister and cousin have both used this pattern for outfits of their own!

Date: Fantasy 
Description: Long coat and chemise 
Time: One day
Cost: Less than $5!


Saturday 9 June 2018

Gibson Girl Ensamble


With the final decision of the theme for our first ball came the need to sew an outfit. I had really wanted to sew a ball gown but I was running out of time too quickly. Also, Mum had picked up a brown sheet from the op shop a few weeks earlier, and because the sheet felt nothing like a normal sheet but was really heavy and tough, it was ideal for a skirt. So I decided to put away my dreams of a ball gown for another time and make a skirt-and-shirt outfit.


I started with the skirt. The iconic feature of this era was a skirt with most of the fullness pulled toward the train. So I cut a half-circle skirt but made the top hole half an oval rather than a circle, which when sewn together, created the look very effectively.


I then atatched it to a waistband and it was done!


I also whipped up a petticoat to help shape the skirt.


Then came the next problem: what style of shirt should I have? I finally came across a sketch of an evening blouse with a boat neck, which was all the convicing I needed to steer away from the iconic high collars.


I ended up making it from the fabris of an old skirt with squence on it. All in all I wouldn't concider it a very periode accurite blouse, but it served it's perpose well!

And finally I whiped together a princess slip and a corset cover to wear underneath.


By this time it was the day before the ball so I had no time to make the dawers or corset so I just boroughed them from my 1860's outfit.

Over all, I'm really happy with how the skirt turned out! It sits so nicely and is really fun to wear. The shirt, however, I'm not completly happy with. The sleeves turned out well but the neckline is quite rebelious and refuses to sit well for long.


Date: 1900
Description: Gibson Girl Evening Assamble
Accuracy: I would say that the skirt it fairly accurate as far as my knowlege goes but the shirt is far from accurate!
Time: About a week on and off
Cost: About $10 (all the fabric was from sheets or op shopped clothes)


God Bless!
Hannah


Sunday 8 October 2017

Dresses for a Little Girl

A while ago a friend asked me to sew two dresses for her daughter. After looking around at different designs, she sent me a link to this dress. However, in order to make it more modest, she asked if the dress could be lengthened and the neckline brought up higher.


The neckline was easy to adjust and I put in a zip in the back of the bodice so she could still get it over her head. The skirt, however, stumped me. If all I did was lengthen the skirt, it would end up looking like a bag, so I had to come up with a way to shape it. The gather on the front and back of the dress made this hard because it added fullness above the waist. I finally decided to cut the front and back panels as rectangles and the side panels flared. To keep the width at the waist reduced, I cut the side panel straight down (keeping the width the same as when it borded the bodice) until it was past the waistline, where I then began the flare.


I then used a old Doona cover to make a mock-up for her to try on. I was pretty pleased with how close I got the pattern to how it needed to be, because I had just guessed most of it. However, there were still a few adjustments I needed to tweek before making the final dresses. I needed to move the shoulder seam out farther and cut the neck a little lower so it didn't choke her.


In the end, I had only one day to sew both dresses so that my sister could deliver them when she saw the family next. It was a tight schedule, but after a full day sewing, I managed to finish both the dresses at eleven o'clock that evening!


God Bless!
Hannah

Thursday 14 September 2017

A Regency Dress


A few weeks before our last reenactment my sister wanted a dress of her own to wear, so I knuckled down to do some rushed research before starting on the pattern.


We found several dresses she liked, and finally decided on the bodice of the one on the left with the sleeves of the one on the right.

gown 1810-15

 I copied the skirt pattern off an original 1815 dress (digram shown above), using straight front and back panels and triangular side panels. It wasn't until after I had cut out the skirt that I read some dresses had front panels that flared into a slight triangle-shape instead of a perfect rectangle. This would have given my sister more of the look she prefers, but alas, there was nothing to do about it now!


All in all, I'm pretty happy with how the dress turned out, although it definitely has its fair share of mistakes. We intended the waist line to be slightly lower and the skirt to be slightly longer, but something happened in construction and somehow it went wrong.


Date: 1815
Description: Day dress
Accuracy: I wouldn't say this dress is completely accurate in that, because of not having done much research of the era before hand, I continually made little mistakes and short-cuts which were far from authentic.
Time: Two weeks, on and off
Cost: About $30


God Bless!
Hannah

Thursday 17 August 2017

My 1860s Corset

I had been 'umming' and 'ahhing' for a few months before I finally decided to make a 1860's corset for my civil war outfit. I used this tutorial to draft my pattern. I must admit, although it was very hard to find original pictures to compare it with, this is probably not the most period-accurate pattern for a 60's corset due to its straight panels. But after finally finding a set of instructions for corset-drafting, I didn't really want to keep looking.


After drafting my pattern, I followed these instructions on sewing a simple corset. However, I didn't realise until I was almost finished that there were supposed to be two layers of duck sandwiching the bones. Somehow I had completely missed this and sewn the bones into the seams (sandwiching it between the main fabric and the seam allowance). For bones that were not on a seam or on a seam that might stretch, I used boning tape. Fortunately, this did not cause any problems (at least, that I have come across), but I have no idea how I missed that!


I ended up using duck instead of coutil because it was about a third of the price. So far, the corset hasn't stretched out of shape, and I'm not too worried that it will because I don't tightlace it.


You wouldn't believe how comfortable it is! It just holds your posture for you without any work on your behalf!

Flossing!


Date: Late 1860's
Description: Corset
Accuracy: The overall shape is fairly accurate but I'm not sure about the straight shape of the panels
Time: I didn't time myself but I think this corset took about the same amount of work as my 1860's dress - the equivalent of one and a half week's solid work.
Cost: It ended up being quite expensive because I could only get the boning and busk online, and all the Australian websites were fairly expensive. I probably spent about $60 all up. (I bought my gear from Aussie Corset Supplies and A Rare Notion)


God Bless,
Hannah

Tuesday 18 July 2017

Civil War Dress

    The first period costume I made was a civil war era dress. 


I saw a style I really liked which had a gathered bodice, and after researching for several months I found that it was quite period accurate.

The dress with the gathered bodice is on the right


    Then the next problem came: where to get a pattern. The only one I could find was in America and they wouldn't ship to Australia so I was thrown into the deep end of making the pattern myself. Since then I have made most of my patterns, but this, being my first and with no help of a pattern drafter, definitely took a while! After about a week and a half of solid sewing I finally finish it just in time for my next reenactment.


Back Veiw


Button and gauging detail

Tucks!!

 I wrote up instructions here for a contest that a friend told me about, and was very blessed to win the grand prize for it!


Date: 1860's
Description: Day dress
Accuracy: Very close, according to my present knowledge of this era
Time: A solid week and a half
Cost: We managed to pick up the fabric for only $2 a metre! However after adding in the thread and overpriced buttons it cost about $30-40.


God Bless,
Hannah

Sunday 9 October 2016

Welcome

Welcome to Stitches in Time where I will be sharing my passion of sewing, hairstyling and historical fashion. I hope you will be blessed by this blog.

God bless,
Miss Gibson